Restoring 505 Sailboat #3392 for Single Handling
Article By Gabor KarafiathMy first exposure to a 505 sailboat was as a youngster in the mid 1960ĺs when the local 505 sailor on Candlewood Lake CT, Mr. Fiorenzi asked me to crew on a day sail when the wind was blowing. I was too chicken to trapeze on the wire, and therefore on the upwind leg we were heeling a lot. áI was amazed at how waves would regularly come over the leeward tank, only to get slurped out by the self bailers. We were moving fast. This was an all white fiberglass boat brought over from England. During the week, Mr. Fiorenziĺs mother would go sailing by herself with just the mainsail hoisted and us kids on the beach would be watching, oftentimes discussing the probability of a capsize as such entertainment was sometimes provided. She would have no trouble getting going again.
So in March of 2009 when I saw the Craigs list ad for a 505 asking $200á áI jumped at the chance. I have a summer house on Smith Mountain Lake in Virginia and single handling the 505 in the light summer breezes appealed to me as potentially more exciting than sailing a Flying Scot or Banshee in light air. And anyway, my wife was out west ski instructing and could not veto the addition of another small sailboat to the stable.
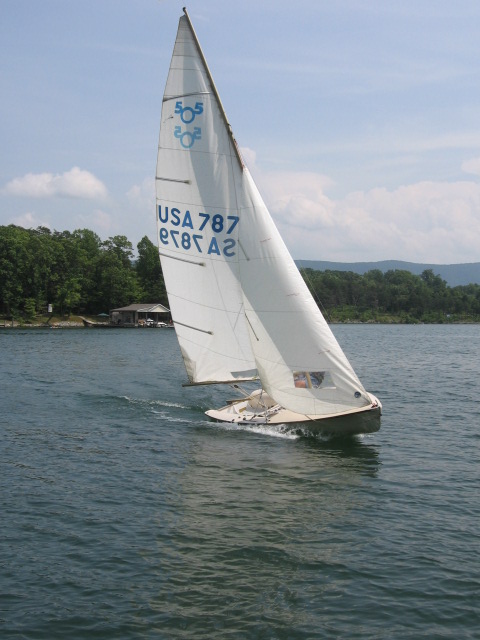
So far the 505 sailing score this summer is 18 to 1, having capsized only once. The boat has fully lived up to my expectations. It is very fast in light air with just one person. When the wind comes up it helps to have a windsurfing mentality for solo ásailing the 505; enjoy the ride and go in whichever direction that you can handle and keep the boat upright. Usually this results in a broad reach and I had a few wild and fast ones, but nothing like the video action at the 2009 San Francisco World Championships. I will let the following annotated pictures tell the story of the boat resurrection.
This is the Ugly Duckling after I dragged it home, removed mud and leaves and hosed it down. It had been weathering in the driveway of a building contractor who had received it as partial payment for work done. With no cover, it was full of leaves and muck. Someone had already attempted some fixes and the fittings were in this muck of leaves and mud. The mast had been resting in a muddy marsh next to boat.
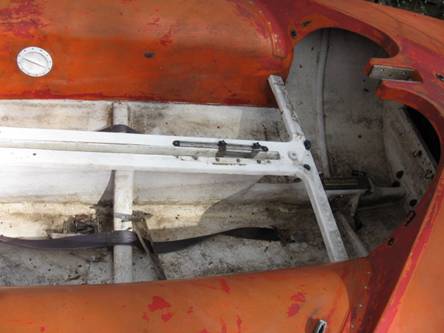
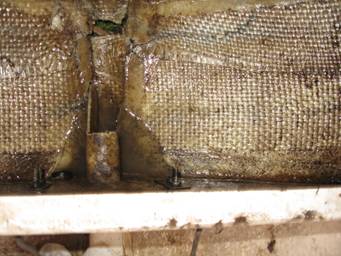
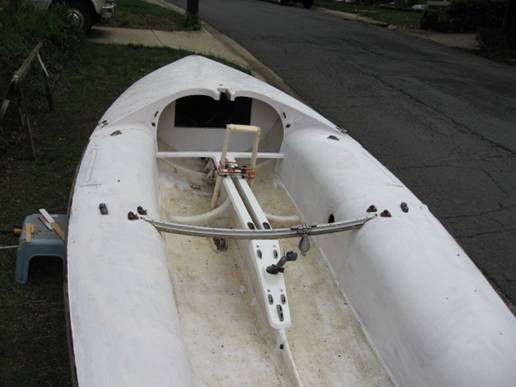
The topsides were initially orange and someone had painted it red with cheap paint that had mostly flaked off. One thing that was to give me some grief later was the adjustable centerboard support mechanism, half of which is in place on the centerboard trunk. See top photo.. The arrangement allowed the centerboard pin location to be shifted longitudinally during a race. áThis arrangement no doubts adds to the "wife unfriendly" reputation of the 505 as all these protruding knobs and screws are sure to result iná black and blues or scraped up legs .á I did not realize at the time that in order to accommodate the arrangement the top portion of the centerboard trunk was wider than the slot at the bottom. I only measured the width at the top and thus the Lindsay replacement board fit the trunk in the retracted position but would not go down when I first launched the boat 3 months later.
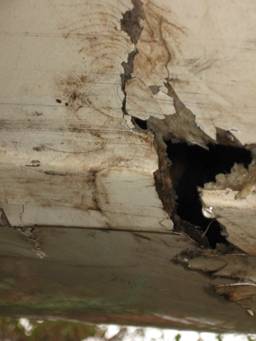
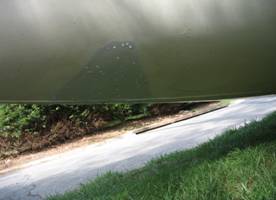
The forward support on the boat trailer had been taken off by someone and I had no U bolts on hand at the time of purchase for putting the support back on The forward roller under the boat had already causedá a puncture in the hull, no doubt made worse by my trailering.
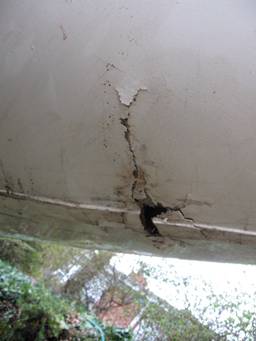
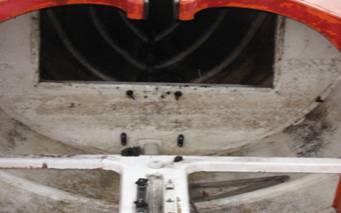
The puncture is just forward of bulkhead, on the other side of the rectangular opening. In the left picture, taken inside the boat directly downwards, you can see a bit of grass through the hole and the damaged area surrounding the hole
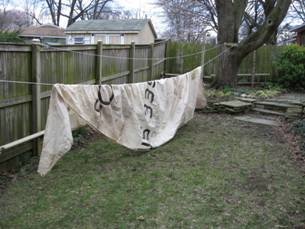
The original sail is from 1968 as shown by the 505 class measurement marking at the northeast regional championships. The mainsail is beyond hope, however I did remove much of the oil and dirt staining by soaking for several weeks in water mixed with a washing soda. The spinnaker was even uglier, a blue-white-orange scheme mixed with the same oily dirt as on the mainsail. Unknowingly, the building contractor put the spinnaker in the washing machine and all of these colors make patterns on the sail similar to a tie-dyed tee shirt.
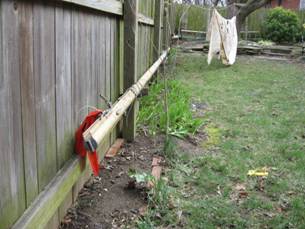
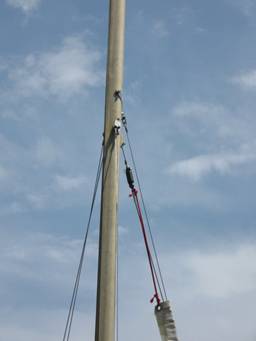
The mast is a gold anodized Proctor mast, a forerunner of the D section, slightly less stiff fore and aft. It is perfect for my needs . The extra flex should make single handed sailing easier. It is also an old vintage where the class rules mandated a sealed mast, which makes righting the boat after capsize easier . The halyards run internally in the sail slot groove. áThe mast is shown above hanging by the side of the fence.
A lot of labor went into getting to this stage, First the hole was patched up. I used silver aluminum tape, normally used on home AC systems, to tape the outside of the hull and to approximate the original hull surface. The inside around the hole was sanded and several layers of glass cloth was laid on the inside covering about 20 inches to each side of the hole. Additional glass work involved flipping the boat and re-glassing the tabbing on the deck stringers and on the inside of the bulkhead. . Then came the cosmetic work. First came the loosening of the orange paint with a pressure washer and then sanding it all off with an orbital sander. The white coat on the topsides is Easypoxy paint primer. The wood homemade clamp is holding two foam pieces glued in for fiber glassing a support for the centerboard pin. The jib tracks are off the boat. They have a recess, a very nice feature for day sailing as you can sit on them. The tracks were originally attached with wood screws into a strip underneath that was originally encased in fiberglass.. Now the wood has thoroughly rotted and would not hold a screw. . I attempted to replace the wood backing, but the original fiberglass covering made that impossible. This after many hours of picking at the rotten wood to get it out!!á I put off the jib track reattachment to get on with the rest of the work.

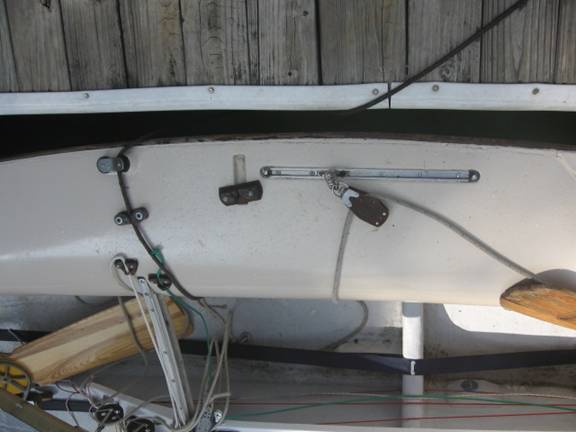
See the new ( green) centerboard pin reinforcement: The top of the trunk with the original centerboard support track is removed and smoothed , and áthe cross bar is reinforced and primed. At the right of the photo are semi circular reinforcement ribs port and starboard. These are hollow tubes with the tops open, the bottoms closed. I drilled drain holes near the bottom, and of course some water came out. The mast step is between these tubes and is thick but hollow with drain holes, you can see one on the forward leg, three inches above the boat bottom.. I eventually drilled drain holes closer to the boat bottom. More water came out.
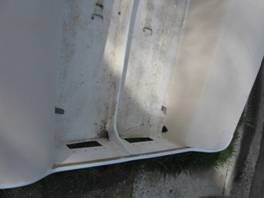
On the right are some mystery fittings, the stainless steel tabs sticking out of the hull bottom and into the cockpit.á There are no holes in the straps. Does anyone have any ideas? Mold removal? So far no one has been able to identify the purpose for the tabs
On the left is the patched hole in the hull bottom. The outside is painted with Rustoleum high gloss white enamel.

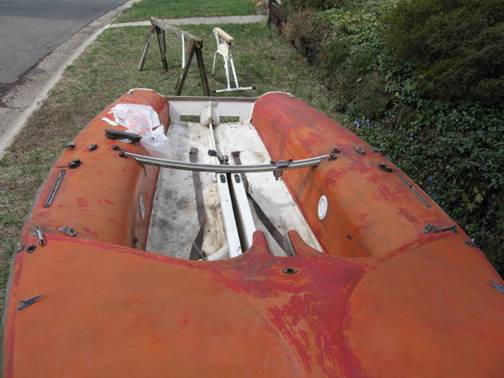
Light at the end of the tunnel: Gracing ( destroying? ) the front lawn. Passersby gawk. Looks like a fast boat! Is it a racer?
The topsides are Easypoxy Sandstone. White is high gloss Rustoleum. Grey is my custom blend of flat white and flat black Rustoleum.
The manufacturerĺs plate is missing. There is no manufacturerĺs number on the transom. Does anyone recognize who made the boat with the distinctive reverse curve traveler?
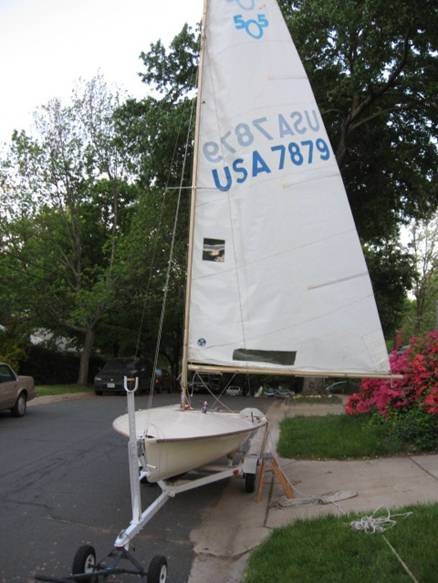
Some might recognize the sail number from Barney. I am very grateful to him for the sails. The sails had belonged to a former 505 sailor. A few patches with sail repair tape fixed it all up, covering all the gnaw holes where critters had nibbled at it. I totally rewired the trailer, steel brushed the rust spots and painted it with ľ you guessed it ľ Rustoleum gloss white. The front roller was replaced by just a long carpet covered pad..
I barely managed to pull up the mainsail. It was a tight fit in sail slot. To undo the halyard lock required a bit more hoist, but the sail did not budge. The mainsail was stuck in the up position. This was at the end of the day with the light fading and the streetlights coming on. I undid the boom and the stays and was ready to lift the mast out Laser style. Where were all the passers by and gawkers when I needed their help most? No one walked by for at least five minutes. I lifted the mast and sail out of the mast step to rest it on the boat bottom and slipped, miraculously maintaining the mast in the upright position. Then I got up and waited some more holding the mast and sail upright.. No one came by. Not wanting to spend the night sleeping standing up and worrying about the possibility of wind I decided to remove the mast and sail the rest of the way by myself. I lifted it up to clear the side of the boat successfully, but just as the mast bottom was about to rest on the concrete I lost the whole rig and it all came tumbling down onto my freshly painted deck. Miraculously there was not a scratch on the deck and the mast was unharmed!!á Just then a family with teenage kids came strolling by, out for a walk at night.
Next day I spent quite a long time spreading the sail slot ever so gently without leaving any burrs and got the sail to slide just fine.
Smith Mountain Lake Sailing: To get to this point in sailing I had to shave about ╝ inch off the centerboard thickness, remove some wood and re-glass it.. To control the removal process I used a mini router to make some grooves in the centerboard to the desired new thickness and sanded off the rest down to the groove. By this time Deanna was home and she was thinking that áher husbandĺs illicit girlfriend was the sanding disk. It has been a lot of work.
Notice the vertical battens on the jib, set parallel to the forestay. When furled they lie perfectly flat with the rolled sail.
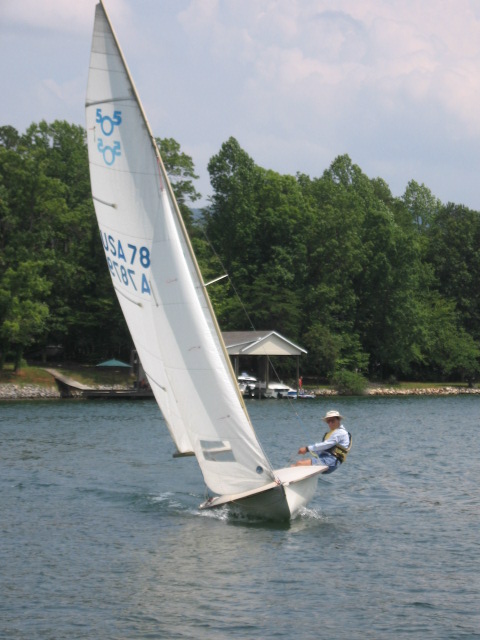
After looking at the photos I realized that I needed to sit further forward, in front of the traveler.
Note the fullness of the jib. It was not designed for this wide sheeting angle, but it is very powerful off the wind.á Also note the jib luff sag. I added an etra. head stay so that I can remove the furled jib without worrying about keeping the mast upright. This second stay carries no load when sailing. Over a number of days of sailing I kept pulling up the jib tighter and tighter only to notice looseness the next day. I may be flexing the hull.
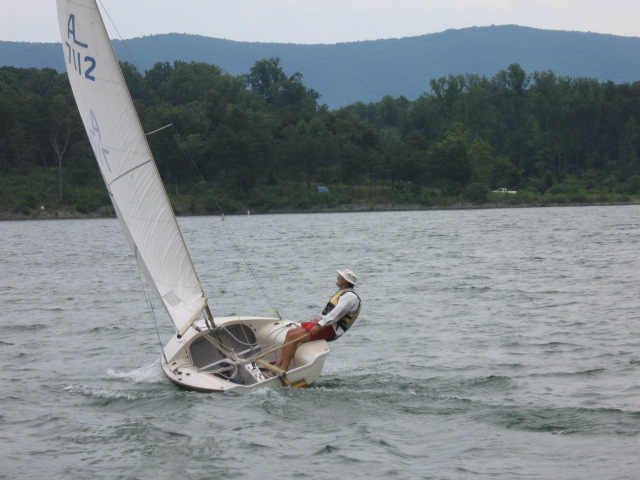
Jude gave me a suit of Albacore sails that are perfectly fine for daysailing.. The boat moves well with just the main. Note that the foot of the sail fits the boom length perfectly!!á Notice the stylizedá AL symbol near the top of the sail
Below are some more pictures for those interested in antique 505 issues and fittings.
I had to make a gooseneck fitting. I put in a request to the 505 class web site for a Proctor sliding gooseneck. Over 200 folks viewed the request, but no one had one in their spare parts bin. So I had to make one from a more modern( black) part that Jesse gave me. The bright aluminum is the new part.
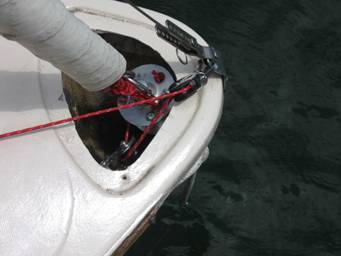
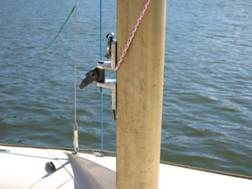
The Furler is recessed into a self draining compartment in the bow
The top of the furler is shown. áThe photo also shows the additional forestay, not 505 legal. It can be removed. In retrospect I think that I could have put a stand-off disk on the forestay and connected it to the top of the jib pulley fitting. I have since replaced the extra wire forestay with some rope that is tied to the base of the mast when sailing.
Below is a close up of deck fittings with the boat next to the dock. The jib sheet lead are pop riveted into a generous bed of 3M- 5200á sealant / adhesive and so far there is áno sign of letting go.
The vertical recess now covered by a bakelite cam cleat was I think for a large Vee jam cleat for the jib.
The fitting with the two rollers holding the brown rope is a spinnaker fitting. The front roller is angled up for use as a spinnaker guy. For using the fittingá for the spinnaker sheet the rope is looped over an open cheek block near the transom.
The jib sheet block is an original Gibb ľautomatic ratchet block. The knurled knob inside the loop adjusts the tension at which the ratchet engages. . I smashed one of these against the dock but was able to replace it with one from England via E bay. áI glued a pad of neoprene on the underside of the block to keep it from marring the deck. So far this has worked well
The rudder blade is also from E bay, an Escape centerboard.
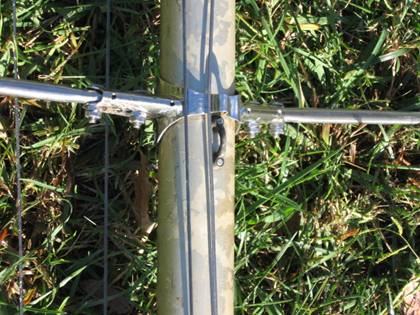
Much thanks to Bill Beaver who sent me a "care package" of áparts including this spreader bracket that I was able to adapt ( bend, mangle) to fit the existing spreader holes on the mast
The rudder blade and tiller was missing from the boat. The bracket was for a tubular aluminum tiller. I like tillers that lift up and whacked off the circular hole in the aluminum rudder head. The tiller extension is made from a fishing rod, very light in weight. There is enough friction in the metal U joint that with such a light weight the extension tends to stay put.
With many thanks to all who have encouraged me, sailing friends from West River Sailing club and from the 505 web site. I hope that you have found this interesting.